Author: patronellamaroale

  • 116935-3-23 SayPro Lesson Adding Contacts

    There are two ways to add contacts:

    • Manually entering informationfor each of your contacts.
    • Importingexisting lists of contacts from other accounts, like Gmail or Hotmail. If you already have a lot of contacts saved with another account, this method can save you a lot of time and effort.

    To Add a New Contact Manually

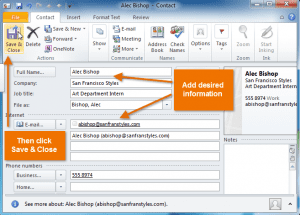
    1. From Contacts view, locate and select the New Contact command on the Ribbon.
      1. The Contact dialog boxwill appear.


      1. Enter the contact information. At the very least, you should enter a first and last name, as well as an email address. However, you can also enter other information, like phone numbersalternate email addresses, and more.


      1. When you are finished filling out the contact information, click Save & Close.

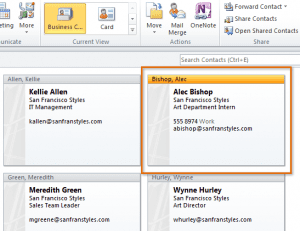
      1. The contact will be added to your contacts list.
  • 116935-3-22 SayPro Lesson Types of address books

    The following are the different types of address books.

    1. Global Address List

    This feature requires you to use a Microsoft Exchange account. Most home and personal accounts do not use Exchange.

    The Global Address List contains the names and e-mail addresses of everyone in your organization. The Microsoft Exchange Server administrator creates and maintains this address book. It can also contain global distribution lists and public folder e-mail addresses. Subsets of the Global Address List are displayed in the Address Book when you choose an entry under All Address Lists on the Show names from the list. You can download the Global Address List for use offline.


    1. Outlook Address Book/Contacts

    The Outlook Address Book is created automatically and contains the contacts in your Contacts folder that have a contact entry in the E-mail or Fax boxes. These contacts display in the Address Book dialog box when you click Contacts in the Show names from the list. If you have a Personal Address Book, it is recommended that you convert your Personal Address Book to Outlook contacts, because Outlook contacts provide flexibility and customization unavailable in the Personal Address Book. For example, you can associate birthdays, several types of phone numbers, anniversaries, Web site addresses, and other custom information with your contacts. The Outlook Address Book is available offline. If you create additional contact folders, you can set the properties on each folder to include the contacts as part of the Outlook Address Book.


    1. Personal Address Book

    Personal Address Books can no longer be created using Outlook. The Personal Address Book is a list of names and distribution lists that you create and maintain. Personal Address Book entries are stored in a file and can be copied to a disk. You can keep the e-mail addresses of your personal contacts in either the Contacts folder, which is recommended, or the Personal Address Book.

  • 116935-3-21 SayPro Lesson Using the address book facility

    By the end of this lesson, learners should be able to:

    • Identify and explain address books in terms of their purpose and use.
    • Add and remove an address from a personal address book.

    a

    The Address Book is a collection of address books or address lists.

    • You can use the Address Book to look up and select names, e-mail addresses, and distribution lists when you address messages. When you type a name in theTo, Cc, or Bcc box of an e-mail message, Microsoft Outlook automatically checks to see if the name you typed matches a name in the Address Book. If there is a match, the name is resolved the Display Name and e-mail address are filled in allowing you to send the message. If there is no match, the Check Names dialog box prompts you for more information or you can create a contact by clicking New Contact. If more than one name contains the letters you typed, you can select a name from the list.


    • In addition to using the Address Book to address messages, you can look up names and other information, such as office locations and telephone numbers, by typing the name in theFind a contact box on the Standard toolbar.


    • When you first open the Address Book, the default address book (usually your Global Address List) is displayed. You can change the default address book and also set other Address Book preferences, such as which address book to check first when sending a message and the location to store personal addresses.


  • 116935-3-20 SayPro Lesson Prioritising the sending of messages

    Set the level of importance for an email message to indicate whether the message needs the recipients’ attention quickly or can be read later. For messages that have an importance-level setting, recipients see a visual indicator in their Inbox.

    In addition, you can include a sensitivity setting. This is an advisory to the recipient on how to treat the contents of the message.

    Change the importance level for a message

    • In the mail message window, on the Message tab, in the Options group, click High Importance or Low Importance.
    • Change for all new messages
      1. Click the File tab.
      2. Click Options.
      3. Click Mail.
      4. Under Send messages, in the Default Importance level list, click HighNormal, or Low.


      Change the sensitivity level for a message

      Each sensitivity setting is only an advisory. Recipients can take any action on the message that they want to, such as forwarding a confidential message to another person. To help restrict actions recipients can do on a message, you should use Information Rights Management (IRM) if available in your organisation.

      The recipients will see the following text in the InfoBar of the message:

      • For Normal, no sensitivity level is assigned to the message. Therefore, no text is displayed in the InfoBar.
      • For Private, the recipient will see Please treat this as Private in the InfoBar.
      • For Personal, the recipient will see Please treat this as Personal in the InfoBar.
      • For Confidential, the recipient will see Please treat this as Confidential in the InfoBar.

      1. In the mail message window, on the Message tab, click the Options Dialog Box Launcher .
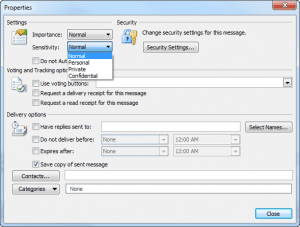
      2. In the Message Options dialog box, under Message Settings, in the Sensitivity list, select Normal, PersonalPrivate, or Confidential.


      Change for all new messages

      1. Click the File tab.
      2. Under Outlook, click Options.
      3. Click Mail.
      4. Under Send messages, in the Default Sensitivity level list, select NormalPersonalPrivate, or Confidential.

      Set the expiration date

      When a message expires, the message header remains visible in Outlook folders with a strikethrough, and the message can still be opened.

      1. On the Options tab, in the More Options group, click the Message Options Dialog Box Launcher .
      2. In the Properties dialog box, under Delivery options, select the Expires after check box, and then click a date and time.
  • 116935-3-19 SayPro Lesson Sorting the mail folder

    Microsoft Outlook automatically groups items by date. However, you can also group items manually by using standard arrangements or by creating your own custom grouping. While you may be most familiar with the default groups in your Inbox, these groups are also applied to other mail folders.

    The default groups that are displayed in your Inbox include TodayYesterdayLast WeekLast Month, and Older. Some of the standard arrangements that are available include grouping according to CategoriesSize, Sender, Subject, and Importance.


    Sorting Messages: Menu Option

    Depending on the size of your computer screen and how you have customized the look of Outlook, all of the mailbox headings may not display or have different options.

    1. Select the mailbox folder containing the messages you want to sort. Select the Inbox.
    2. From the View tab, in the Arrangement grouping, select the desired option.
    3. Sorting Messages: Column Heading Option If you have several messages in your mailbox, you can sort them by any field in the Content area. By clicking a column heading you toggle between ascending and descending order sorting option. You can add, delete, or rearrange columns, referred to as fields, in the Content area.
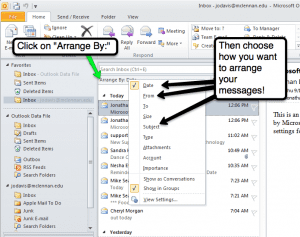
      • Click the column heading you want to sort on. The messages will now be sorted by that column. Click Received and see how items are sorted. NOTE: By clicking the column heading a second time, the sorting order is reversed. The arrow in the heading indicates whether the field is sorted in ascending or descending order. Example below shows: From, Subject and Received.
      • Or