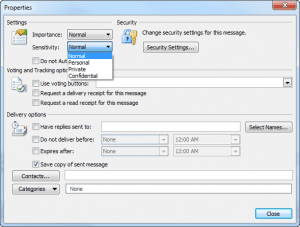
Set the level of importance for an email message to indicate whether the message needs the recipients’ attention quickly or can be read later. For messages that have an importance-level setting, recipients see a visual indicator in their Inbox.
In addition, you can include a sensitivity setting. This is an advisory to the recipient on how to treat the contents of the message.
Change the importance level for a message
- In the mail message window, on the Message tab, in the Options group, click High Importance or Low Importance.

- Change for all new messages
- Click the File tab.
- Click Options.
- Click Mail.
- Under Send messages, in the Default Importance level list, click High, Normal, or Low.
Change the sensitivity level for a message
Each sensitivity setting is only an advisory. Recipients can take any action on the message that they want to, such as forwarding a confidential message to another person. To help restrict actions recipients can do on a message, you should use Information Rights Management (IRM) if available in your organisation.
The recipients will see the following text in the InfoBar of the message:
- For Normal, no sensitivity level is assigned to the message. Therefore, no text is displayed in the InfoBar.
- For Private, the recipient will see Please treat this as Private in the InfoBar.
- For Personal, the recipient will see Please treat this as Personal in the InfoBar.
- For Confidential, the recipient will see Please treat this as Confidential in the InfoBar.

- In the mail message window, on the Message tab, click the Options Dialog Box Launcher .
- In the Message Options dialog box, under Message Settings, in the Sensitivity list, select Normal, Personal, Private, or Confidential.
Change for all new messages
- Click the File tab.
- Under Outlook, click Options.
- Click Mail.
- Under Send messages, in the Default Sensitivity level list, select Normal, Personal, Private, or Confidential.
Set the expiration date
When a message expires, the message header remains visible in Outlook folders with a strikethrough, and the message can still be opened.
- On the Options tab, in the More Options group, click the Message Options Dialog Box Launcher .
- In the Properties dialog box, under Delivery options, select the Expires after check box, and then click a date and time.
Leave a Reply
You must be logged in to post a comment.